How to Build Deck Steps and Stairs
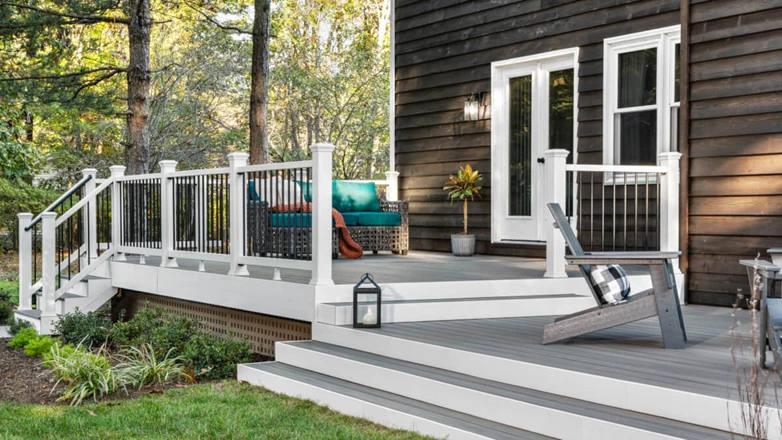
Building deck stairs can be challenging because potential mistakes exist at different stages, from landing pad and railing issues to misalignments with the stair tread step dimensions, rises, and depths. When making deck stairs, you must also comply with local building codes to ensure the steps are safe. Although the project sounds daunting, our guide will take you through the process step by step as you replace your existing deck stairs or build a set of new ones.
Anatomy of Deck Stairs
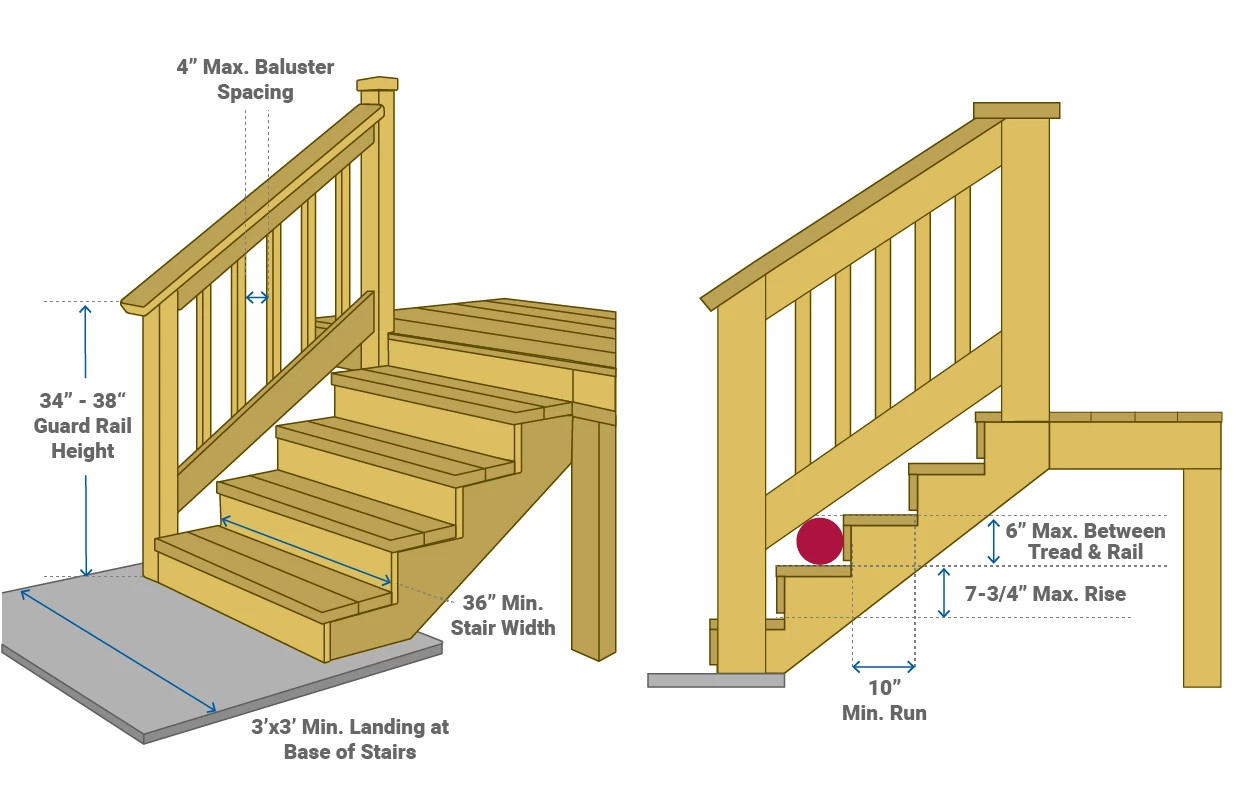
Before you start building, you must first learn the parts of deck stairs.
- A landing pad is a flat surface made of concrete, pavers, or gravel at the bottom of the steps. Building codes in most areas specify that there must be a landing.
- Stair treads are the horizontal boards that you step on. Stair treads may be made of a single 2×12 but typically have two decking boards — usually 2x6s or 1x6s. The stringers must be spaced properly to support the size of the board selected for the treads.
- A stringer is a wide board, often a 2×12, that runs at an angle from the landing pad to the deck framing and supports the treads. An “open” stringer has notches that you can see, while a “closed” stringer is a solid board with cleats for the treads. It might also be an open stringer with a solid board attached to the side.
- Risers are boards installed on the ends to cover the vertical spaces between the treads. Risers are typically made of fascia board or decking material.
- A stair tread is the width (or depth) of a single stair run.
- A stair rise is the vertical distance from the top of one tread to the top of the next tread. The total run is the overall horizontal distance that the stringer travels. The total rise is a stairway’s overall change in height from the landing pad to the top of the decking.
Tools and Materials Needed to Build Deck Stairs
Building deck stairs requires multiple tools and materials. Remember, you must gather all the right tools and invest in high-quality materials if you want your deck stairs to stand the test of time. Here is a complete list of the materials and tools needed to build deck stairs.
Tools Required
- Bar clamps
- Circular saw
- Drill
- Framing square
- Hammer
- Jig saw
- Level
- Measuring tape
- Paintbrush
- Pencil
- Safety glasses
- Scissors
- Shovel
- Sledgehammer
- Speed square
- Stakes
- Upside-down marking paint
- Utility knife
Materials Required
- Decking boards
- Railing
- Fascia boards
- Beam & joist tape
- 3″ SDWS Simpson strong tie framing screws
- 5″ Simpson strong tie SDWS timber screws
- 8″ Simpson strong tie SDWS connector screws
- SDWS 5″ fasteners
- Simpson strong tie SD connector screws
- Simpson Stair Stringer connector straps
- Decking screws
- Fascia screws
Planning Your Deck Stairs
Consider Costs
Calculating the cost of building deck stairs is the first step. Before you get started, create a budget and add up the cost of the materials and tools that you will need. The average price of building deck stairs varies depending on the size and materials used, but it usually ranges from $1,500 to $2,000. An A15-rise stairway can cost at least $1,500 at the bare minimum for the decking, risers, fascia, stringers, screws, and hangers.
Consider the size of the stairs, the type of wood used, and the materials for the railings when calculating costs.
Be Aware of Code Requirements
Before starting your project, check the local deck stairs code. For your safety and the safety of others, there are specific code requirements that you must meet when building deck stairs. If your project is not up to code, you may face penalties and, in some cases, may have to remove the stairs.
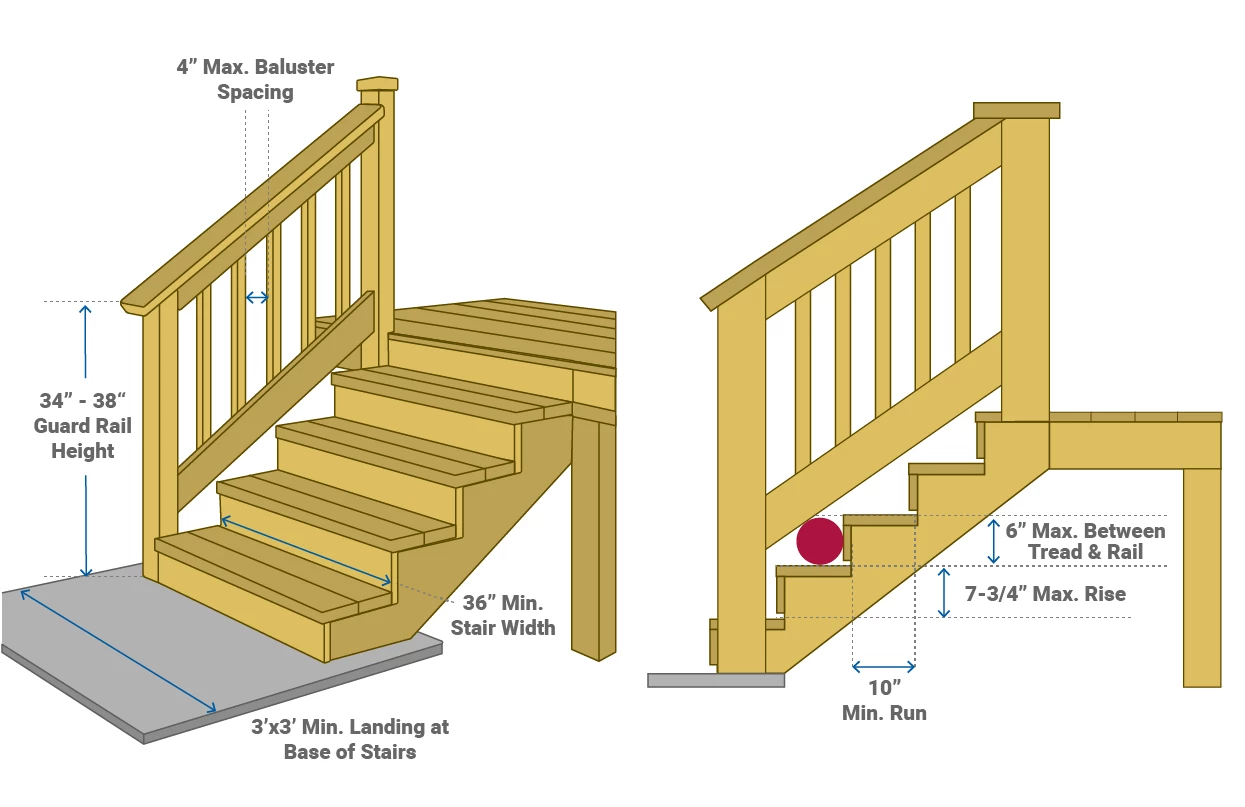
- The stair treads should be at least 36 inches wide. Despite these minimum requirements, we recommend that stairs should be at least 48 inches wide so that they don’t feel cramped.
- The maximum allowable stair rise is 7 ¾ inches, and the minimum stair rise is 4 inches. The difference between a stair’s longest and shortest riser height or stair depth should be no more than ⅜ inch. This is quite strict, so take the time to plan your stringers carefully.
- Openings in the railing should be no larger than 4 inches between balusters. A 6 inch sphere cannot pass between the bottom rail and the tread. You can test this by trying to pass a 6-inch sphere between the bottom rail and tread. If it fits through, the gap is too large.
- Please include 1-3 sentences of copy emphasizing the need to meet code requirements in a decking stairs project. This should include that it is to ensure individual safety.
- Leverage the existing copy below. If there are additional elements to include, Seer recommends updating this list to improve user understanding.
Determine the Location of Stairs and Access Points
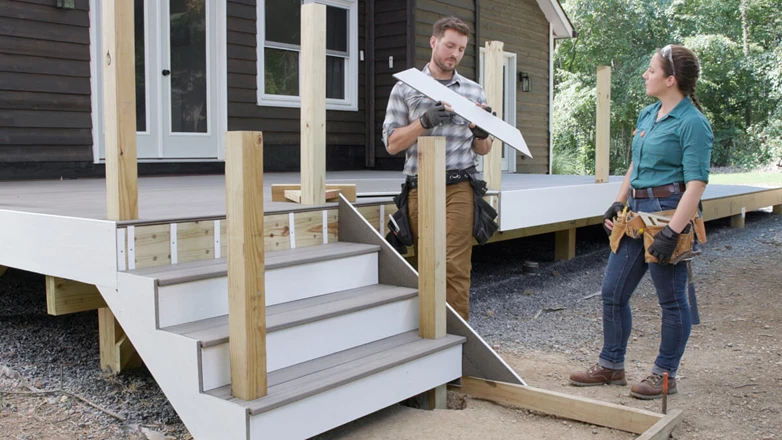
When deciding where to put your deck stairs, you must consider several important factors. Start by thinking about foot traffic on the deck and where people naturally enter and leave the deck. You want to place the stairs where they are easily accessible, but you also don’t want to disrupt the natural flow. Make sure there is an easy exit route in case of emergency, too.
Draw Up a Plan Before You Build
Deck stairs must be precise, so you should always draw a detailed plan before building. Once you have created your plan, double-check all measurements before you start building deck stairs, including ensuring that all stair rises (the vertical height of the steps) and the tread depths (the horizontal length of the step runs) are equal. Significant differences in the height or length of stairs can be a tripping hazard. Remember that failing to plan correctly will only lead to problems during the build.
How to Build Deck Steps and Stairs
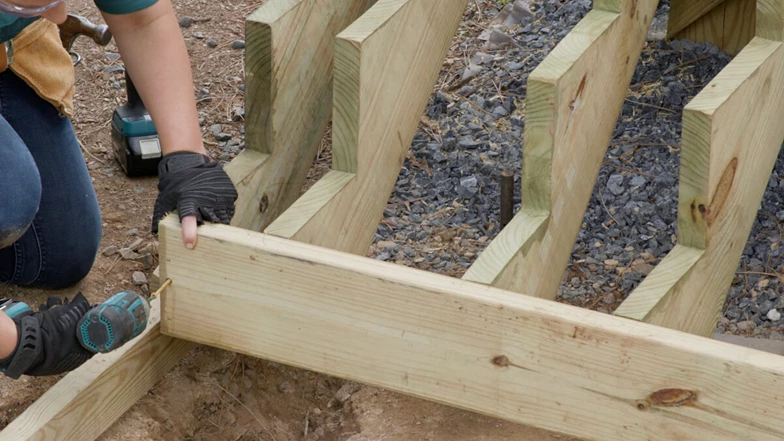
Once preparations are complete, you can begin building your new deck stairs. Start by measuring the total rise to the deck and calculating the number of risers and treads. Then, you can mark things out and cut each piece before fixing your stairs together. Follow the detailed steps below to learn how to build stairs for your deck.
Step 1: Measure the Total Rise to the Deck Landing
First, measure the total rise to the deck landing. The best way to get the total rise is to decide roughly where you want the stairs to end, keeping in mind that the stair angle should be around 40 degrees.
Then, take a straight board and rest it on the deck. Extend this board over the side so that it sits above the proposed landing point for your stairs, and measure straight down to the ground. This gives you the total rise — the total height of your deck stairs.
Step 2: Calculate the Number of Risers
To determine the number of risers you need, take a piece of wood and mark every 7 ¾ inches (7 ¾ is the maximum height allowed by municipal codes). This wood can be used as a story pole to signify the height of each step. Place the story pole upright next to the deck, and count the pole sections between the floor and the deck. This gives you the number of rises you need.
Alternatively, you can take the figure for the total rise calculated in Step 1 and divide it by 7 ¾. Round the figure up or down to the nearest whole number, keeping in mind that it gives you an approximate number of risers, not an exact figure. While 7 ¾ is an average riser height, they can be anywhere from 4 inches to 7 ¾ inches. You may need to recalculate the number of risers with a different riser height to get it to fit nicely. You will calculate the exact height of the risers later on.
Step 3: Calculate the Number of Treads
This step is relatively easy. Take the number of risers and subtract one. You need a tread for each step, apart from the top one because the deck surface forms the tread.
Step 4: Calculate the Exact Distance to the Landing Pad
Once you know the number of treads, you can work out where your landing pad needs to be. Measure the depth of each tread and then multiply it by the number of treads to get the precise distance.
For example, each tread comprises two 5 1⁄2 boards, with a ¼-inch gap between them (the gap allows for contraction and expansion when the temperature changes). This gives a total of 11 1⁄4 inches per tread (the run measurement). The support stringer has a run of 10 ½ inches (11 ¼ inches minus ¾ inches overhang (or nosing) of the tread). So, three steps would extend 31 1⁄2 inches from the deck. This is where the support stringer ends and the landing pad begins. The tread itself will extend past this point, but that is fine because the landing pad supports the stringer, not the treads.
Step 5: Calculate the Exact Riser Height
Start by measuring the total rise and then divide it by the estimated number of risers you worked out in Step 2. This result gives you the exact height of each riser, which should be between 4 and 7 ¾ inches. If the riser height exceeds this range, add or remove a riser from the total and redo the calculations. Remember that recalculating also means you must recalculate the number of treads and the landing pad distance.
You can use our Stairs Calculator to find the measurements and double-check that everything is correct. When you are happy with the measurements, sketch out all the dimensions; you can use the drawing as a guide when you start building your DIY deck stairs.
Step 6: Mark and Cut the Stair Stringers
Once you have your run and rise measurements, make a template on a piece of scrap wood. Use your speed square to square the end of a piece of 2×12 to give a 90-degree angle at the end. Then, mark the measurement of one riser on the side and the run measurement along the top.
Join the two points and draw a diagonal line between them. Once you cut along the diagonal with a circular saw, you have a template of the run and rise measurements that you can use to mark the stair stringers.
You should remove the tread thickness from the bottom of the stringer. Upon completing one stringer, you can use it as a template to mark the others.
After double-checking that the stringers are marked correctly, it’s time to cut out the notches. First, cut close to the corner of the mark with a circular saw, and then finish with a handsaw to avoid weakening the stringer.
Step 7: Test-Fit the Stringer
Place the stringer against the deck to check its fit. It should be flush against the deck and fit perfectly between the deck stairs and landing. Once the stringer is in the right place, use a level to check that the treads are level and even.
Step 8: Establish and Prepare a Landing Point
If you are building deck stairs and a landing, you need to prepare this landing point now. First, clamp your stringers to the deck to check the distance, and then start measuring the area for a concrete landing pad. The minimum size for the landing pad is 36 x 36 inches.
Dig wooden forms into the ground and secure them with stakes. Then, clamp a piece of 4×4 to the end of the outside stringer and mark around it with marking paint. This shows where the bottom newel posts need to go. Remove the stringers and dig holes for the posts to create your deck stairs with a landing.
Step 9: Outline the Stair Pattern onto the Fascia Boards
Use the stringer to outline the pattern of the stairs onto the fascia boards, which will run outside the stairs. Mark and cut the top and bottom from the fascia boards and double-check that they fit correctly. Then, attach the stringers to the inside of the fascia boards with approved fascia screws spaced 9 inches apart.
Step 10: Attach the Stringers to the Rim Joist
Start by drawing vertical plumb lines to mark the stringers where the fascia boards will sit, adding a horizontal line between them to mark where the top of the tread will go. Using approved screws, screw a temporary 2×2 into the deck’s rim. The stringers will attach here, and you can then remove the 2×2.
Put three more deck screws through the stringers from the back of the rim to fix them to the deck frame temporarily. Then, fix the middle stringer in place with two deck screws. Put the newel posts into the holes you dug earlier, and screw them to the inside of the stringer.
Step 11: Attach 2×6 Supports
Stability is crucial when making deck stairs, so you must attach supports. From the back, screw a piece of 2×6 horizontally along the width of all stringers. Then, take two more pieces of 2×6 and fix them vertically, attaching them to the back of the deck rim and the first piece of 2×6.
Step 12: Check That Everything Is Square
Start by nailing the bottom riser to the stringer, with two nails in each stringer. Now, you need to check that everything is square and stable. Do this by cross-tapping the basic structure you have built and taking measurements at the top and the bottom. The two cross-measurements must be equal. If not, gently tap the structure to move it side to side slightly and retake measurements until they are identical.
Step 13: Add the Stair Risers and Treads
It is time to attach the remainder of the risers and treads. Screw the risers in first and then screw the tread into the top, leaving a small ¼-inch gap between the boards. Repeat this process until you reach the top of the stairs.
Step 14: Pour Concrete and Attach Stairs to the Landing
Using at least 2,500 psi concrete, pour in the concrete to create your landing pad and level it off with a straight piece of 2×4 lumber. The concrete can then be finished with a magnesium float. A magnesium float is a flat piece of magnesium (sometimes aluminum is used) with a handle. It allows you to float concrete at the desired pressure and angle. Magnesium floats come in a range of lengths and widths, so once you have completed the measurements for your landing pad, you can find a suitable size.
Deck Stair Pro Tips
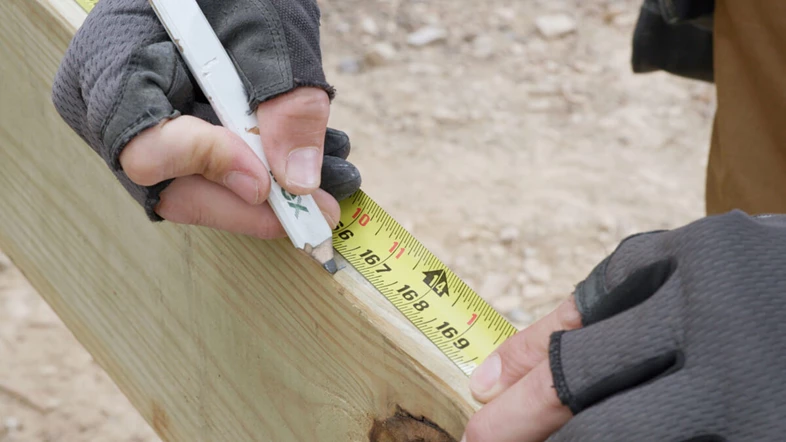
Building deck stairs is achievable as long as you take your time with it. However, any miscalculations could make the results dangerous. Here are some tips to help you avoid common mistakes when building a set of deck stairs.
- An open stringer should not have notches too deep; otherwise, the stringer will be weak.
- The stair railing posts should be firmly attached to the deck structure or the ground.
- The stair railing should include a graspable handrail in most cases.
- Stringers should be spaced close enough to adequately support the treads. This spacing depends on the tread materials. If treads are 2-by lumber, stringers can usually be as far apart as 16 inches on the center. If 5/4 decking or composite decking is used, they should be 9 to 12 inches or closer. Always check with your building department and follow the decking manufacturer’s installation instructions.
Start Building Your Deck Stairs Today
Budgeting, precisely measuring, and securely fixing everything are the most important things to remember when building your deck stairs. You can’t go far wrong if you follow the above steps and stick to building codes. If you are ready to get started and are confident about tackling the project on your own, Find a Retailer and begin gathering materials. Alternatively, you could Find a Contractor and let them handle the job for you.