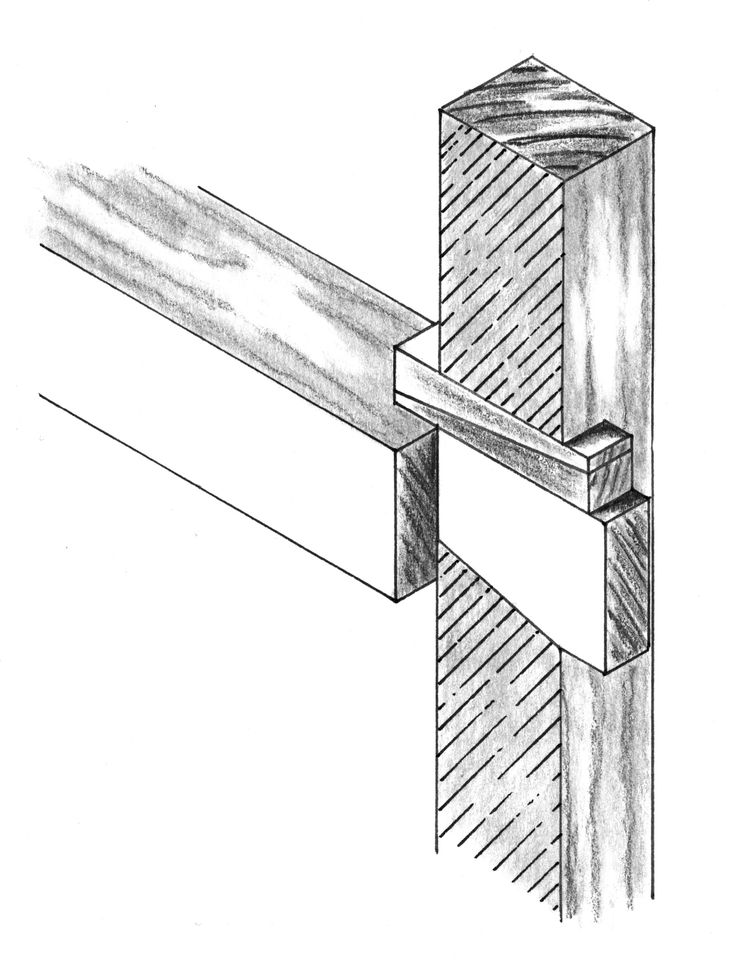
Blind Dovetail Thru Mortise and Tenon

 Blind Dovetail Thru Mortise and Tenon
This joint shows up fairly regularly in books that document joinery and it seems to be predominately utilized in timber framing applications. Even so, I have wanted to explore this joint for a while and see if it would lend itself to furniture building. Given that I tend to “color outside of lines” with my designs, this joint may prove handy in solving a problem or two that may crop up.
As its name implies, the tenon is shaped as half a dovetail and the mortise is chopped and pared to match. The entrance side of the mortise is matched to the height of the tenon. The exit side of the mortise is enlarged with a sloping floor that allows the dovetail tenon to engage the mortise. The creation of the sloped floor and seating of the tenon results in gap between the top of the tenon and the roof of the mortise. Wedges are then used to secure the assembled joint.
The joint gains strength from the engaged dovetail tenon and the compression that is applied with the wedges. When properly executed, the joint will draw up square and, in theory, should draw an assembly square without the need for clamps.
One of the unique advantages of this joint is that it can be disassembled with relative ease. Making it very useful for something along the lines of a trestle horse that can be taken down and transported. For furniture applications I see more of a permanent assembly being in order. Once the wedges are secured, I’ll cut them flush.
To execute this joint, as with any mortise and tenon, I started with the layout of mortise. First the height (A) of the tenoned piece is marked around the piece to receive the mortise. Once that is established the offset (D) is determined and marked on the exit face of the mortised piece. Non of the references that I found gave any guidelines as to depth or angular degree for the offset that creates the dovetail. I noted on my drawing above that the offset should be 1/3 the height or less of the tenoned piece. Be aware that this is an arbitrary guideline of my own making. Generally, it seems to make the most sense for strength and will help with consistency when I use this joint. Specifically in furniture sized workpieces. With height and slope established, I marked out the width of the mortise based upon the rule of thumb that the mortise should be no wider than 1/3 the thickness of the material. For the joint to be effective the tenon must me shouldered. This point may play a role in determining the width of your mortise. So keep it in mind.
Next up is the layout of the tenon. Obviously the width and the offset (D) need to match that of the mortise layout. The length of the tenon should long enough that the tenon will protrude thru the mortised workpiece. How much it protrudes is not important unless it plays a role in the intended aesthetic design of the overall piece. So the tenon length is the depth of mortised piece (B) plus a little bit more. At this scale 3/8″(10mm)-1/2″(12mm) seems about right.
With the layout complete I chopped the mortise. First chopping a square thru mortise and then chopping and paring the sloped floor.
I then began work on the tenon. First completing all of the rip cuts so as to preserve the layout lines.
The second operation was to saw around the shoulder freeing the cheeks and the sloped section to establish the dovetail.
Which brings me to the wedges. The references to this joint typically show it secured with a single wedge. The bypassing wedges are an extra step that will result in uniform compression across the tenon. The second advantage is that, if sawed flush, there are no gaps between the wedges and the top of the mortise, either on the exit or entry side of the joint. Either wedge configuration will work though.
Assembly is straight forward. Insert the tenon, seat the dovetail and install the wedges. A good bit of force can be used when installing the wedges without fear of destroying the workpieces since the compression created by the wedges is against the end grain of the mortised piece. A surprising amount of force actually.
Finally a look at the joint with the wedges and stub of the tenon cut flush and planed.
Opened up to show the internals.
Will I use this joint a lot in my furniture designs. Probably not, but it will prove very useful to know when a design dilemma calls for it.


